Tuesday 15 November 2016

Add custom drop down in ckeditor

Hi
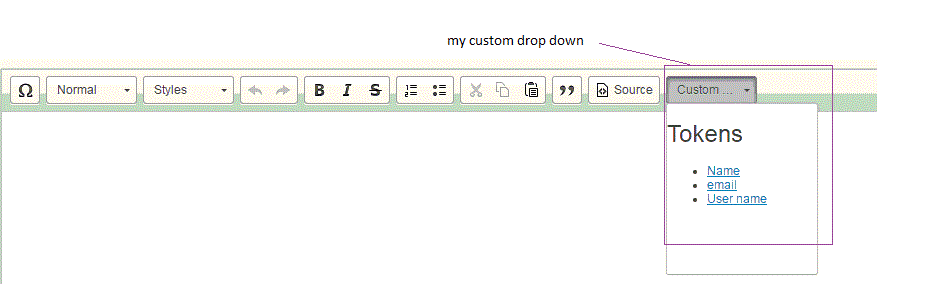
In this post I am adding custom drop down in ckeditor also I downloaded ckeditor in my local and using locally not from cdn link.

path of my ckeditor folder which I downloaded from net

/webapp/jscr/ckeditor

ckeditor is my directory.

inside ckeditor have created one folder namely tokens.
inside tokens folder we created a file plugin.js

so the path of my plugin.js is

/webapp/jscr/ckeditor/plugins/tokens/plugin.js

content of plugin.js

CKEDITOR.plugins.add( 'tokens',
{
   requires : ['richcombo'], //, 'styles' ],
   init : function( editor )
   {
      var config = editor.config,
         lang = editor.lang.format;

      // Gets the list of tags from the settings.
      var tags = []; //new Array();
      //this.add('value', 'drop_text', 'drop_label');
      tags[0]=["[contact_name]", "Name", "Name"];
      tags[1]=["[contact_email]", "email", "email"];
      tags[2]=["[contact_user_name]", "User name", "User name"];
   
      // Create style objects for all defined styles.

      editor.ui.addRichCombo( 'tokens',
         {
            label : "Custom DD",
            title :"Custom DD",
            voiceLabel : "Custom DD",
            className : 'cke_format',
            multiSelect : false,

            panel :
            {
               css : [ config.contentsCss, CKEDITOR.getUrl( editor.skinPath + 'editor.css' ) ],
               voiceLabel : lang.panelVoiceLabel
            },

            init : function()
            {
               this.startGroup( "Tokens" );
               //this.add('value', 'drop_text', 'drop_label');
               for (var this_tag in tags){
                  this.add(tags[this_tag][0], tags[this_tag][1], tags[this_tag][2]);
               }
            },

            onClick : function( value )
            {      
               editor.focus();
               editor.fire( 'saveSnapshot' );
               editor.insertHtml(value);
               editor.fire( 'saveSnapshot' );
            }
         });
   }
});

I have lots of fields inside my html and we are using thymeleaf, so I am not pasting all code here
only text area where we have to bind our ckeditor.

now content of my html file is

<textarea name="editorArea" id="editorArea">

<script type="text/javascript" src="jscr/plugins/ckeditor/ckeditor.js"></script>
<script>
window.onload = function() {
  
   CKEDITOR.replace( 'editorArea',{
   toolbar :
        [
           ['SpecialChar'],
           ['Format'],
           ['Styles'],
           ['Undo', 'Redo'],
           ['Bold', 'Italic', 'Strike'],
           ['NumberedList', 'BulletedList'],
           ['Cut', 'Copy', 'Paste'],
           ['Blockquote'],
           ['Source'],
           ['tokens']
           
        ],
        extraPlugins: 'tokens'
 });
    }
</script>
here I am facing issue of thymeleaf custom attribute thats y we use 
window.onload else in simple html no need.


Hope this would work as it is working for me.
Thanks

Friday 2 September 2016

Web content display, template and structure in Liferay Embedding Google map

In this post I am embedding google map inside basic web content which we can display in our portlet page using Web Content Display portlet one of out of box portlet(oob).

Steps to follow
1) We have to create one structure and then one template.

a) Creating Structure
  Run server and sign in then we can see this

Click on Admin then on Content


You will navigate to this page


Now from here our work will start first I will create a structure.
So to create structure we will follow these steps
First go on Manage then click on Structure
Here you can see all created Structure if already created
Click on Add
Then one new page will open in which we can add our required field.
Here I will use only one text field.
Give the name of Structure(mandatory), description of Structure is optional.
You can select parent Structure if you want to use.
Here I am not using any parent Structure.


Now we can add our required field here.
Just drag and drop


We can drag our required field from left to right


If you select any element that you drag from left to right then in left side you can change element properties.
In left panel you can change its name and field label, repeatable true or false etc.
If repeatable is true then in creation of basic web content part we can add this element number of times.

Here whatever name of the element we can give here we can get the value of that element in our template by using that name only.
Here I am not going to change name of this element.
But it is always recommended that give some meaning full name.
Here name is: Text1515
By this we can get value in our Template.
I given name as "My Structure" and then save it.
So our structure is created.


Some time because of error, creation of Structure and template may fail so you have to check your IDE console.
If created successfully then no error and you can see your Structure here. Last row "My Structure".

b) Steps to create template.

Again web content part from web content
Manage and then select Template

Then add


Here I give template name as "My Template", description is optional.
Here We selected our Structure that we just created.
Also selected Velocity language.

There are three option
FreeMarker(by default selected)
Extensible Style Sheet
Velocity.

We are working with Velocity(.vm)
Go through Velocity Template language(vtm or vm) concept means tutorial

So we want to get data from text box that we created inside our Structure.
Here I will add one div inside which I will embed my google map code using jquery.
For google map I search some address and then get its embedded value by going to menu and then select share of embed map. You will get iframe code for that specific location


When you click share or embed map then one popup will open with two tab
i) Share link
ii) Embed map
Please copy code from embed tab where you get complete code with iframe tag.
I pasted that copied content from embed map option.

To get google map you have to add this code inside your template like this


Below is the code present in above image

<script src="http://ajax.googleapis.com/ajax/libs/jquery/1.7.1/jquery.min.js" type="text/javascript"></script>

<script>
    $(window).load(function() {
        document.getElementById("myGoogleMap").innerHTML = '<iframe src="https://www.google.com/maps/embed?pb=!1m18!1m12!1m3!1d3983.9510487626503!2d101.59288311424224!3d3.107652154274243!2m3!1f0!2f0!3f0!3m2!1i1024!2i768!4f13.1!3m3!1m2!1s0x31cc4c18cfff72c1%3A0x786ab007dc694d0f!2sKelana+Puteri+Condominium%2C+Ss+7%2C+47301+Petaling+Jaya%2C+Selangor%2C+Malaysia!5e0!3m2!1sen!2s!4v1472834995630" width="600" height="450" frameborder="0" style="border:0" allowfullscreen></iframe>';
    });
</script>

 p.thick {
        font-weight: bold;
    }

<div id="myGoogleMap">
</div>

<p class="thick">
    $Text1515.getData()
</p>


here "Text1515" is name of element that I gave in structure.
$Text1515.getData() to getting that element value.
So our template also created and ready to use.
We created one template and one structure and then now we will create one basic web content in which we can use this.

Again go to web content part of Content section and then
add -> Basic Web Content.


Default Basic Web Content page


Now we will select our created Structure and Template
Then image will change like this


Please select Structure value changes to My Structure and Template also changes to My Template.
I gave name and filled text box manually.
Now we will publish this.

So you can see one entry will be added in web content page.

Go to portal home page and then add from application section
Web Content Display.


Click this Select Web Content link then

Just click our created Basic Web Content, it will selected automatically.
and then save
close this popup page and then refersh and you can see the map in web content.
Final image after web content display added to our home page

Wednesday 3 August 2016

Adding file to Documents and Media(dlfileentry table) from ServiceImpl class liferay through web service

In this post I will upload file to dlfileentry table through my EntityServiceImpl class.

My intention is to add/upload a file to dcouments and media through my web service.

First we created one entity in service.xml file

<entity name="MyServiceGateway" local-service="true" remote-service="true">
</entity>

This will use as gateway for web service and not creating any column inside it.
I want to use only its services as generated after service build.

remote service must be true for creating web service.

For web service you have to do some configuration.
Please go through this post:
http://liferayasif.blogspot.my/2016/06/expose-liferay-web-services.html

After all above configuration add this code to in MyServiceGatewayServiceImpl class.
Note:
    If you change method signature even return type then we have to build service again
When you modified some code inside method and no modification in method signature then only portlet deployment requires no need of build service.
Please also do build wsdd.

@AccessControlled(guestAccessEnabled=true)
public void fileUpload(File file) throws SystemException, PortalException{

if(Validator.isNotNull(file)){
try{
long companyId = CompanyThreadLocal.getCompanyId();
String groupName = GroupConstants.GUEST;
Group group = GroupLocalServiceUtil.getGroup(companyId, groupName);
long groupId = group.getGroupId();
long repositoryId = groupId;
ServiceContext serviceContext = new ServiceContext();
serviceContext.setAddCommunityPermissions(true);
serviceContext.setAddGroupPermissions(true);
serviceContext.setAddGuestPermissions(true);
serviceContext.setCompanyId(companyId);
serviceContext.setScopeGroupId(groupId);
serviceContext.setDeriveDefaultPermissions(true);
InputStream is = new FileInputStream( file );
String mimeType = MimeTypesUtil.getContentType(file);
String description = "added programmatically";
                                String title = file.getName();
try{
FileEntry fileEntry = DLAppServiceUtil.addFileEntry(repositoryId, 0, file.getName(), mimeType, title, description, "", is, file.getTotalSpace(), serviceContext);
log.info("fileEntry :"+fileEntry);
}
catch(Exception e2){
e2.printStackTrace();
}
log.info("absolute path: "+file.getAbsolutePath());
}
catch(Exception e){
log.info("outer group err: "+e.getMessage());
}
}
else{
log.info("File is null");
}
}

URL of our web service will get from
first open
localhost:8080/api/jsonws
Then select your plugin project from context path drop down.
Select specific method from list
If you press invoke and then go to url example you can see url of your web service.

Now if we hit it postman then it gives error that authentication requires.
So you have to hit by using credentials.
May be this is not secure but may be helpful for someone.

Now how to hit from postman.
I am pasting some snap shot of postman
First go Authorisation tab, from type drop down select Basic Auth.
Give username and password then update request.

After this step check this snap shot
In headers Authorisation value will generate automatically.


In body tab select form data radio button add key value.
On the basic of parameter please add this key value.
Key must mtch with your arguments name.
Suppost I have single formal argument for method
e.g.
myMethod(File myFile){
    //Here code
}
Then key in Body tab must be myFile, match with our formal arguments.

And then finally this snap shot


Then hit.

If you face any problem please comment, if possible I will try to reply.
Thanks

Monday 1 August 2016

liferay web service file upload

Hi
In this post I will first create web service and with the help of post man I will upload a file.
Here I will also increase the size of column using "portlet-model-hints.xml" file.
First I say thanks to Sudheer Kumar liferayway helps me to get the concept of increase of size of column.

We use liferay build service to create table
I am using two tables one is a just gateway to access other services.
My service.xml is

<entity name="EDServiceGateway" local-service="true" remote-service="true">
</entity>

<entity name="FileUploader" local-service="true">
  <column name="fid" type="long" primary="true"/>
    <column name="content" type="String"/>
</entity>

Then build service and also build WSDD.

After build service open /WEB-INF/sql/tables.sql

You can see
create table fileuploader (
fid LONG not null primary key,
content VARCHAR(75) null
);
Here content is name of our column and the default size is VARCHAR(75) if we use String data type in our service.xml file.
To increase its size we have to follow these steps

Open portlet-model-hints.xml

<model name="com.slayer.model.FileUploader">
<field name="fid" type="long" />
<field name="content" type="String" />
</model>

Above is default generated sql by default after service build.
We want to increase the size of content column.
To do this we have to modify file as below code.

<model name="com.slayer.model.FileUploader">
<field name="fid" type="long" />
<field name="content" type="String">
<hint-collection name="CLOB" />
</field>
</model>

This is our final code.
If you have source code of liferay portal then you can search a file.
portal-model-hints.xml.
In this file hint-collection="CLOB" already declared with very big size.
After above changes then build service again.

Now this time check your tables.sql file

create table fileuploader (
fid LONG not null primary key,
content TEXT null
);
Size of content column changes to TEXT type.

Please don't forget to build WSDD.

Number of services will create.

Here I am using FileUploaderLocalServiceImpl to upload file to db.

import java.io.File;

import com.liferay.counter.service.CounterLocalServiceUtil;
import com.liferay.portal.kernel.log.Log;
import com.liferay.portal.kernel.log.LogFactoryUtil;
import com.liferay.portal.kernel.util.Base64;
import com.liferay.portal.kernel.util.FileUtil;

public class FileUploaderLocalServiceImpl
extends FileUploaderLocalServiceBaseImpl {

Log log = LogFactoryUtil.getLog(FileUploaderLocalServiceImpl.class);

public boolean add(File file){
   log.info("add()");
byte[] bt;
    long fid=0L;
    try {
     fid=CounterLocalServiceUtil.increment();
     FileUploader f = fileUploaderLocalService.createFileUploader(fid);
     bt = FileUtil.getBytes(file);
     f.setContent(Base64.objectToString(bt));
     fileUploaderPersistence.update(f, false);
    } catch (Exception e) {
    log.info("Err: "+e.getMessage());
    return false;
    }
    return true;
}

}


Class that expose web services
public class EDServiceGatewayServiceImpl extends
EDServiceGatewayServiceBaseImpl {

Log log = LogFactoryUtil.getLog(EDServiceGatewayServiceImpl.class);

  @AccessControlled(guestAccessEnabled=true)
public JSONArray fileUpload(File file) throws SystemException, PortalException{

  System.out.println("---------------->"+file);
  System.out.println("---------------->"+file.getAbsolutePath());
  log.info("file : "+file);
 File f = file;
 boolean bool = fileUploaderLocalService.add(file);
 log.info("success: "+bool);
  log.info("file name : "+f.getName());
 JSONArray ar = JSONFactoryUtil.createJSONArray();

 return ar;
}

}


if you try this one from
your ip:8080/api/jsonws/EDModule-portlet.edgateway/file-upload
Then it gives one error


This is I don't know why but you can access it through post man

First copy web service url


From here you get the url of generated web service.
Use this web url from post man.


Hit send and hope so it will work.
Thanks


Sunday 19 June 2016

Expose liferay web services

Hi
In this tutorial I will discuss how to expose liferay web services

Here I am using sql server
portal-ext.properties file

jdbc.default.driverClassName=net.sourceforge.jtds.jdbc.Driver
jdbc.default.url=jdbc:jtds:sqlserver://localhost/spadnew
jdbc.default.username=sa
jdbc.default.password=root


To access  JSON web services Using IP address  add the below configuration in portal-ext.properties
---------------------------------------
auth.token.check.enabled=false
json.service.auth.token.enabled=false

axis.servlet.hosts.allowed=192.168.3.12, 127.0.0.1, SERVER_IP


Add the below jar file in  TOMCAT_SERVER}/lib/ext)
cors-filter-1.3.2.jar
java-property-utils-1.7.1
After that, you have to restart your Tomcat Server instance.

These are the configuration for access web service 

we have to also add some content to our web.xml 
Here we have two web.xml
one is visible inside our project in eclipse
and the path of this is
WorkSpace\liferay-portal-6.2-ee-sp14\tomcat-7.0.62\webapps\gallery-portlet\WEB-INF\web.xml

We have another web.xml which is created by exlipse (may be)
F:\LiferayWorkSpaces\WorkSpace\liferay-portal-6.2-ce-ga2\tomcat-7.0.42\webapps\ROOT\WEB-INF\web.xml

content that we have to paste inside web.xml is 

If you want to use Liferay RestFull API through AJAX calls (or jQuery JSon calls).

You have to set Cors Filter in web.xml of Liferay ROOT on the server.

This is the code for web.xml

<!-- CorsFilter per call Rest API in AJAX/jQuery-->
<filter>
<filter-name>CORS</filter-name>
<filter-class>com.thetransactioncompany.cors.CORSFilter</filter-class>
<init-param>
<param-name>cors.allowOrigin</param-name>
<param-value>*</param-value>
</init-param>
<init-param>
<param-name>cors.supportedMethods</param-name>
<param-value>GET, POST, HEAD, PUT, DELETE</param-value>
</init-param>
<init-param>
<param-name>cors.supportedHeaders</param-name>
<param-value>Accept, Origin, X-Requested-With, Content-Type, 
Last-Modified, Access-Control-Request-Method, Access-Control-Request-Headers</param-value>
</init-param>
<init-param>
<param-name>cors.exposedHeaders</param-name>
<param-value>Set-Cookie</param-value>
</init-param>
<init-param>
<param-name>cors.supportsCredentials</param-name>
<param-value>true</param-value>
</init-param>
</filter>
<filter-mapping>
<filter-name>CORS</filter-name>
<url-pattern>/*</url-pattern>
</filter-mapping>

Than, you have to import in ${TOMCAT_SERVER}/lib/ (or better ${TOMCAT_SERVER}/lib/ext) this two jars:
cors-filter-1.3.2.jar
java-property-utils-1.6.jar
After that, you have to restart your Tomcat Server instance.

If we want to access through url without sign in then it throws error
to avoid this error we have to give some annotation to our method
Suppose we have an entity Complaints
so we have to write our method that is exposed by liferay is
ComplaintsSeviceImpl.java

@AccessControlled(guestAccessEnabled=true)
 @JSONWebService(value = "getOpenAndClosedComp", method = "GET")
 public JSONObject getOpenAndClosedComp() 
   throws SystemException {
   }
   
   
   hit url : http://10.35.115.177:8080/api/jsonws
   
   from context path drop down we have to select our portlet
   then it will display list of methods that we created in our impl class.
   In this case our method name is "getOpenAndClosedComp"
   

Sunday 12 June 2016

SQL Server management studio login

Here I am describing first how to install sql server and then connect with liferay.
I am using
Liferay 6.2 EE
Microsoft SQL Server Management Studio 2012
Windows 8
Here I am facing problem to first install and then login as a "sa" user.
So first install SQLEXPR_x64_ENU
then we install SQLManagementStudio_x64_ENU
I tried to search from windows + s
SQL SERVER but not getting any result.
It is installed but not visible in search.
You have to search it by pressing windows button like


then


Once you select it then visible to search in windows 8.
First open
SQL SERVER configuration manager.
then in
Sql Server Network Configuration -> protocols for SQLEXPRESS
Enable all protocols

Please restart sql service.
By closing sql server management studio window or Sql Server Configuration Manager windows doesn't stop service.
For start and stop service windows + r (run command) write services.msc
and then can restart SQL Server (SQLEXPRESS).

Now open sql server management studio
After connect SQL Server using Windows Authentication mode
Follow these steps


Then ok

Simply change the password and then login through sql server authentication.
For changing password you will get number of tutorial in net.
You will also get this from net but it was difficult for me to find out this.
After that to connect with liferay please follow this link.
Click here


Monday 4 January 2016

Liferay Spring portlet

Hi
My post is a reference for me and it is really helpful for me.

In this post I simply creating a simple spring MVC portlet.

First create portlet.
Name of my portlet is myportlet, portlet will added automatically.

Steps for configuration

1) I added my spring related jar files in "liferay-plugin-package.properties" file.
In properties mode

It is difficult to remember each and every jar that we have to added, then just copy paste in source mode in liferay-plugin-package.properties file. Save and close file and refresh your portlet and then open it, it will reload all files if you check in properties mode

portal-dependency-jars=\
    spring-web-portlet.jar,\
    spring-web-servlet.jar,\
    spring-web.jar,\
    spring-context.jar,\
    spring-beans.jar,\
    spring-core.jar,\
    spring-asm.jar,\
    spring-expression.jar,\
    jstl-api.jar


2)  In web.xml file

Add servlet and servlet-mapping tag.

<?xml version="1.0" encoding="UTF-8"?>
<web-app id="WebApp_ID" version="2.5"
xmlns="http://java.sun.com/xml/ns/javaee" xmlns:xsi="http://www.w3.org/2001/XMLSchema-instance"
xsi:schemaLocation="http://java.sun.com/xml/ns/javaee http://java.sun.com/xml/ns/javaee/web-app_2_5.xsd">

<servlet>
<servlet-name>ViewRendererServlet</servlet-name>
<servlet-class>org.springframework.web.servlet.ViewRendererServlet</servlet-class>
<load-on-startup>1</load-on-startup>
</servlet>

<servlet-mapping>
<servlet-name>ViewRendererServlet</servlet-name>
<url-pattern>/WEB-INF/servlet/view</url-pattern>
</servlet-mapping>

</web-app>


3)my portlet.xml file
You have to edit portlet-class and init-param tag.

<?xml version="1.0"?>

<portlet-app xmlns="http://java.sun.com/xml/ns/portlet/portlet-app_2_0.xsd" xmlns:xsi="http://www.w3.org/2001/XMLSchema-instance" xsi:schemaLocation="http://java.sun.com/xml/ns/portlet/portlet-app_2_0.xsd http://java.sun.com/xml/ns/portlet/portlet-app_2_0.xsd" version="2.0">

<portlet>
<portlet-name>my-portlet</portlet-name>
<display-name>MyPortlet</display-name>
<portlet-class>org.springframework.web.portlet.DispatcherPortlet</portlet-class>
<init-param>
            <name>contextConfigLocation</name>
            <value>
            /WEB-INF/context/myspring-config.xml
            </value>
        </init-param>
<expiration-cache>0</expiration-cache>
<supports>
<mime-type>text/html</mime-type>
</supports>
<portlet-info>
<title>MyPortlet</title>
<short-title>MyPortlet</short-title>
<keywords>MyPortlet</keywords>
</portlet-info>
<security-role-ref>
<role-name>administrator</role-name>
</security-role-ref>
<security-role-ref>
<role-name>guest</role-name>
</security-role-ref>
<security-role-ref>
<role-name>power-user</role-name>
</security-role-ref>
<security-role-ref>
<role-name>user</role-name>
</security-role-ref>
</portlet>

To understand "DispatcherPortlet" please read this.
Here I provided a path of "myspring-config.xml" file.

4)we have to create "myspring-config.xml" folder inside WEB-INF/context/ folder.

<?xml version="1.0" encoding="UTF-8"?>
<beans xmlns="http://www.springframework.org/schema/beans"
xmlns:xsi="http://www.w3.org/2001/XMLSchema-instance"
xmlns:context="http://www.springframework.org/schema/context"
xmlns:tx="http://www.springframework.org/schema/tx"
xsi:schemaLocation="
http://www.springframework.org/schema/beans
http://www.springframework.org/schema/beans/spring-beans-3.0.xsd
http://www.springframework.org/schema/context
http://www.springframework.org/schema/context/spring-context-3.0.xsd
http://www.springframework.org/schema/tx
http://www.springframework.org/schema/tx/spring-tx-3.0.xsd">

 
<context:component-scan base-package="com.myspring" />

<bean id="viewResolver"
class="org.springframework.web.servlet.view.InternalResourceViewResolver">
<property name="viewClass"
value="org.springframework.web.servlet.view.InternalResourceView" />
<property name="prefix" value="/WEB-INF/jsp/" />
<property name="suffix" value=".jsp" />
</bean>
</beans>

/WEB-INF/jsp/, my all jsp will be inside this folder.


Package of my controller class "com.myspring"


5)Now I am writing my controller class.

package com.myspring


import javax.portlet.RenderRequest;
import javax.portlet.RenderResponse;

import org.springframework.stereotype.Controller;
import org.springframework.web.bind.annotation.RequestMapping;

import org.springframework.web.portlet.bind.annotation.RenderMapping;


@Controller
@RequestMapping(value = "VIEW")
public class MyControllerClass{

//if we don't mention any param name with "@RenderMapping" then it is default render method.
//in spring mvc portlet we can create any number of render method as our need.
//So this is our default render method
//and it will always returns to the  "/WEB-INF/jsp/view.jsp"
//whenever hit our controller class either by using render url(if we don't mention any render method //explicitly in our render url)  or by action url
//Note: Render will not execute if we call resourceurl.


@RenderMapping
public String load(RenderRequest request,RenderResponse response)
throws SystemException {
return "view";
}

//This is custom render method and it will execute if direct
//our portlet to execute this specific render method

@RenderMapping(params="action=manualRender")
public String manualRender(RenderRequest request, RenderResponse response){
return "secondview";
}

@ActionMapping(params = "action=redirectSamePage")
public void redirectSamePage(ActionRequest request, ActionResponse response){
System.out.println("this is addContent method");
//Here our default render method will execute after
//execution of action method.
}

@ActionMapping(params = "action=redirectOtherPage")
public void redirectOtherPage(ActionRequest request, ActionResponse response){
response.setRenderParameter("action", "manualRender");
//here we are calling render method "manualRender", so our
//default render method will not execute and hence we will redirect to
//secondview.jsp
}

}

6) I will create one folder /jsp inside WEB-INF folder
Inside /jsp folder I will create two jsp
view.jsp and secondview.jsp


So first view.jsp

<%@ taglib uri="http://java.sun.com/portlet_2_0" prefix="portlet" %>
<%@ taglib uri="http://liferay.com/tld/theme" prefix="theme" %>
<%@ taglib uri="http://alloy.liferay.com/tld/aui" prefix="aui" %>

<portlet:defineObjects />
<theme:defineObjects />

<portlet:renderURL var="manualRenderURL" windowState="normal">
<portlet:param name="action" value="manualRender" />
</portlet:renderURL>

<portlet:actionURL var="redirectSamePageURL" name="addUseCaseContent">
<portlet:param name="action" value="redirectSamePage" />
</portlet:actionURL>

<portlet:renderURL var="manualRenderURL" windowState="normal">
<portlet:param name="action" value="manualRender" />
</portlet:renderURL>

<h3>This is view.jsp page for default render method</h3>

<aui:a href="<%= manualRenderURL %>">Click Here</aui:a>


<aui:form action="<%= redirectSamePageURL %>">
<aui:button type="submit" value="Same page" />
</aui:form>

<aui:form action="<%= redirectOtherPageURL %>">
<aui:button type="submit" value="Other page" />
</aui:form>


Note: Here I create one render url in which I mention
name="action" value="manualRender"
We have to create a method with this name that I already created in my controller class.
So this method will execute and inside this render method what string we would return will be our render jsp.
So here I used " secondview.jsp" and hence after clicking that url we will redirect to  secondview.jsp.
Please use a sysout inside manualRender method to check that this method is executing or not.

code of secondview.jsp

<h1>This is secondview.jsp</h1>